Specialized in Object and Library & Archive Conservation

Archaeological Roman Goblet
Report Summary
Owner: Bryn Mawr Art and Artifact Collection
Accession #: ACP 1793 B (Bryn Mawr G22)
Object: Roman Glass Cup
Object Date: Est. Late Roman/Early Byzantine era
Materials: Soda lime glass (est.)
Dimensions: 3 1/16 (h) x 2 13/16 (dia) x 1/8 (thick) in. 7.9 (h) x 7 cm (dia).
Consulted:
Lauren Fair: Head of Objects Conservation and Affiliated Assistant Professor, Winterthur Museum, Garden & Library and the University of Delaware
Marianne Weldon: Objects Conservator and Collections Manager for Art and Artifact Collections, Bryn Mawr College
Rosie Grayburn: Associate Scientist and Affiliated Associate Professor, Winterthur Museum, Garden & Library and the University of Delaware
Catherine Matsen: Scientist and Affiliated Associate Professor, Winterthur Museum, Garden & Library and the University of Delaware
Report Date: 05/17/2021
Treatment Images
Historical Context
The amount of Roman glass to survive is the largest of any period throughout history. Most archaeological Roman glass is found in fragments and the majority of complete glass objects come from cemeteries as burial objects. Glass vessels were widely used for eating, drinking, and storage of various products such as cosmetics, wines, and oils. We can make a reasonable assumption that this glass was used for drinking based on the size, shape, and that a similar glass vessel from the Art Institute of Chicago was also used for drinking. Unfortunately it is difficult to find a plethora research on vessels like the goblet because it is not decorated, not very large, and does not have many parts (like handles). Much research on Roman glass focuses on the technique and manufacture of more decorative vessels and the Roman glass trade.
Materials and Technology
The following text is borrowed from a report previously written about this object by Katie Rovito, with minor additions by me.
Glass is composed of a network of silica (SiO4) usually obtained from sand, a flux to lower the melting temperature, and a network modifier to stabilize the structure. The most common type of glass found from Ancient Rome is soda-lime glass, where sand was the source of silica, natron was the flux, and lime was the stabilizer. Natron is the sodium carbonate produced from burning maritime or desert plants. It is believed that the primary source of natron in Ancient Rome was located in Wadi El Natrun in Egypt. The lime was either naturally occurring in the sand deposits, or added in the form crushed sea shells.
It should be noted that different factories completed different steps of the manufacturing process, and composing the raw materials was separate from producing the final object. The glassmaking process began with fritting, where the glassmaker would repeatedly melt, pulverize, and re-melt raw materials. The glass make would produce ingots and canes of glass to trade with other craftspeople.
William Gudenrath, glassblower, scholar, and advisor to the Corning Museum of Glass has published extensively on Roman glassblowing techniques. He demonstrated how to make a “Roman foot” in a video on the Corning Museum’s website. While Gudenrath’s demonstration could be approximately how this goblet was constructed, it should be noted that in addition to the pontil scar, there is a sphere of glass in the interior of the bowl, above the stem. Part of the construction could have been inserting a tool from the base, into the bowl, to form this bump.
Condition and Description
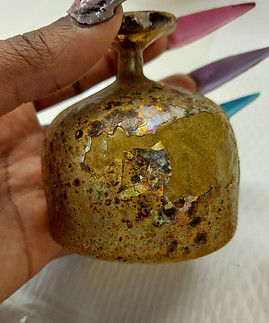
The object is an archaeological soda lime glass goblet from the Mediterranean. A goblet is defined by Oxford Languages as a drinking glass with a foot and a stem. The bowl is u shaped, the stem is short, and the foot is circular. The object is translucent overall but in varying degrees. The rim of the goblet is on a tilt, with the lower side of the rim being thicker (2mm) than the higher side of the rim (1mm). There is a lump on the underside of the foot from where the pontil was detached during construction.
The object is in unstable condition overall. There are thick, brown weathering layers throughout the exterior surface. It is difficult to determine if there is surface dust and dirt The interior of the bowl has a clouded appearance but does not display the same brown weathering layers as the exterior surface. The weathering layers are actively flaking and there are small areas on the bowl and the foot where the weathering layer has flaked off, revealing a green/yellow iridescent glass layer that is more translucent than the weathering layer.
There is a 4.5 cm long fill made of gold colored materials that is failing. There are losses in the glass above and below the fill. Parts of the fill are darker in color compared to the majority of the lighter gold color. The fill has varying levels of opacity. The glass around the fill is more opaque than the rest of the bowl. The cause of the opacity is unknown. One possibility for the fill material is waterglass: a material that has been historically used for glass and ceramic repair. It is made from melting silica with excess alkali (sodium or potassium) to make a water soluble adhesive that becomes insoluble in water once dried. There is a 3cm long break in the foot that has been previously repaired. ‘G22’ is written on the underside of the foot in black.
Treatment Summary

Consolidation
The weathering layers on the glass were actively flaking during handling. I used approximately 8% Paraloid B-72 in 1:1 ethanol/acetone. Upon initial application this was too shiny. Cab-O-Sil was added as a matting agent to better match the glass surface sheen.

Toning & Coating Paper
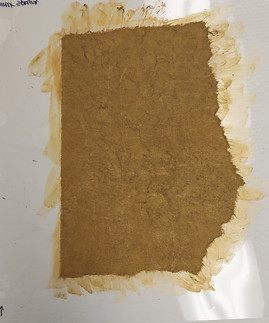
I toned the HM-3 mino gami paper using Golden fluid acrylics in raw sienna, iridescent bronze, Indian yellow, and burnt umber light. I took strips of the toned paper and coated them in 30% B-72 over silicone release Melinex, taking advantage of the excess B-72 around the edges in adhering the strips.

Fill Analysis
XRF and FTIR were both performed on the fill in order to determine it's make up and inform treatment plans for removal. The FTIR results are included in the Treatment Images section above. Due to a drastic change in condition, the fill was able to be easily removed.

Filling the Loss
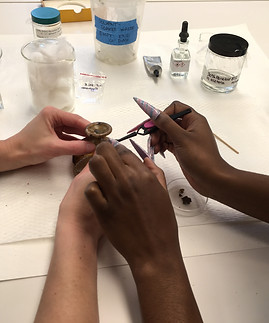
I used strips about a half inch wide to fil the loss piece by piece. This method helped me mimic the curvature of the glass. I was able to achieve a nice shape by applying some strips diagonally instead of vertically. I used acetone to reactivate the B-72 on the strips and applied pressure with a silicone tipped tool while the adhesive set.

Reassembly
We used 30% Paraloid B-72 in acetone to reassemble the fragments. Hot melt glue dots and blue painter's tape were tested as methods to hold the fragments in place. Blue tape was shown to not take any weathering layers with it upon removal. Excess B-72 was cleaned off with acetone.
PC: Lara Kaplan

Adhering Fragments
Now that the fill could provide additional support, I adhered the remainder of the fragments. There were a multitude of small fragments whose locations were difficult to identify. I was instructed by the curator to adhere these fragments to the fill even in an incorrect location, to prevent disassociation.


